I’ve had a few users ask if they can change the height of the header in LearnDash’s Focus Mode. The answer is yes, and this tutorial will provide the exact CSS you need to use.
Category: Tutorials Page 4 of 7
Learn how to customize various aspects of the LearnDash LMS, including design, custom CSS, quizzes, certificates, payment solutions & more.
In our Design Upgrade Pro plugin, we offer the ability to set LearnDash Focus Mode content to run from edge-to-edge. The left navigation bar will still be present, but the rest of the content area will span from the right edge of the navigation, right up to the right edge of the user’s browser.
This is great for those creating content with page builders. You can use your own spacing via the page builder elements/widgets, and build more creative layouts.
Our plugin only provides the option to do this globally, for every single piece of content in Focus Mode. This includes all lessons, topics & quizzes. But what if you want to only apply it to topics? Or only to quizzes? This tutorial will show you how.
In this article, I’ll walk you through how to integrate Easy Digital Downloads with LearnDash, step-by-step. In addition, I’ll explain my reasoning for choosing Easy Digital Downloads (EDD) as the platform to power my recent online training platform, ldx.training.
I’ve seen this question come up many times now, so I figured I’d post the solution online for all to see.
Are you using the LearnDash course grid to display your lessons in grid format? If you’re using the [ld_lesson_list] shortcode (or block) on your course page, and want to hide the default lesson list, here’s the solution.
In LearnDash’s course grid, only the featured image & “see more…” button are clickable by default. If you click on the course title, or the short description, nothing happens. Many people expect the course title to take them to the course page, so let’s see how we can make that happen.
For a lot of LearnDash users, the course grid add-on is an essential component to designing the learning experience. You can filter & sort the course grid in a myriad of ways. This article will focus on one of the key components of the course grid—the short description.
Update: 8 Feb 2021 (version 1.7 of course grid plugin)
Short descriptions now support most HTML tags.
We’ll explore:
- how to add a short description
- what you might want to use it for
- some tricks on how to customize its formatting
Some creative ideas include:
- display course authors
- indicate the total time it takes to complete a course
- display the amount of credit (or CEUs) a student might receive for completing the course
- how to add bold, italics & insert new lines
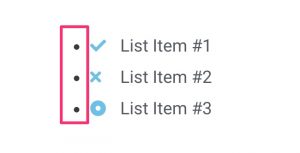
Many of you who use LearnDash also use Elementor to build your lesson & topic pages. This article addresses a very specific design issue when using the Elementor Icon List widget.

In LearnDash Focus Mode, Elementor icon lists have bullet points next to them, and this is not the expected behavior. This is because LearnDash’s CSS overrides Elementor’s CSS for icon lists.
I’ll provide the CSS to remove the bullets that LearnDash adds and return your Elementor icon lists back to normal.
By default, LearnDash loads all of its CSS files on every single page of your WordPress site. But many of your pages don’t include any LearnDash elements, and therefore don’t need this CSS.
This article will explore a few different ways to conditionally load LearnDash styles only on the pages that need it.
Justin from the LearnDash Facebook group asked if there was a way to automatically add numbers before each lesson using the BuddyBoss theme + platform. I was pretty confident the answer was yes, so I rolled up my sleeves and got to work.
Not only can we do this for BuddyBoss, but I’ll provide you with the CSS to do this for all themes using the LearnDash 3.0 template, as well as those using the Legacy template. I’ll even throw in some code to auto-number lessons & topics in the Uncanny LearnDash Toolkit Dashboard.
This is the perfect solution for those who want to display lesson/topic numbers in navigation & course lists, but not include the number in the actual lesson or topic title. This way, the numbers don’t show up at the top of each individual page. They only appear when viewing lists & navigational elements 👍.
It also works great for those who switch lessons & topics around or use them in multiple courses with shared course steps.
How to Enable Comments for LearnDash
By Dave Warfel
On April 19, 2020
In Tutorials
With LearnDash, one of the easiest ways to encourage discussion amongst your students, as well as the instructor, is to use native WordPress comments. There are forum plugins and third-party live chat solutions, but using comments is a quick & simple way to allow for discussion to take place within your LearnDash courses.
There are a few steps to ensure comments are enabled for LearnDash. Let’s walk through each one.
Read More